
.png)
Are you looking to transform an outdated or unused room into a cozy and inviting guest bedroom without breaking the bank? With a little planning and creativity, you can create a welcoming space for your guests to enjoy, all for under $1,000. In this blog post, I'll guide you through the initial steps of planning and preparing for a budget-friendly guest bedroom makeover! Stay tuned for the guest bedroom reveal!!
A little backstory..
We bought a 1960's fixer upper house, instead of a brand new build! In doing so, that means there was a lot of DIY in our future. If you haven't seen how we completely transformed our house, you can read about that here, including the story of when we were quoted $16,000 to scrape our popcorn ceilings.. it was at that moment, I knew we would be DIYing a lot of our fixer upper house.


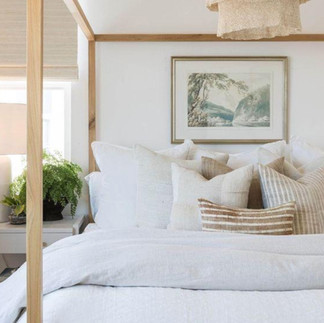


INSPO PICTURES:
Alexis Andra Austin | Pure Salt Interiors | The Heart and Haven
When we first moved into our home, we prioritized the main level living space. Our third bedroom was initially my office and after 9 months of living in our home, the spare room acting as my office was not fully functional for our family. We had no where for our guests to sleep, comfortably. Yes, we have a pull out sofa bed, and the kids can sleep downstairs on the floor, but we envisioned a dedicated, cozy space for our guests. CUE: a room makeover!
Overview of the Project
Goals:
Make the most out of our Third Bedroom: Having a dedicated home office is just not functional for our family anymore. I no longer needed a full room to house all of my "inventory" from being in Direct Sales, and I knew I could downsize a ton to move my office into our multi-functional utility room.
Create a Minimal, Neutral, Cozy Feel: The primary goal is to design a space that feels both minimal, neutral, and cozy, providing a restful environment for our guests. A space to unwind and feel at peace! Neutral colours was a must to create a cohesive look within the rest of our house.
Stick to a Budget: With a budget of under $1,000, every dollar needs to be carefully allocated to achieve the desired look without overspending.
Pretty and Practical: Think boujee on a budget. While my husband is all about functionality, I truly believe things can be both pretty and practical, all while staying on a budget!

How all of our bedrooms looked when we got our 1960's fixer upper.
Budget:
Total Budget: $1,500
Here's a breakdown of how we plan to allocate our budget:
Bedding: $0 We want to use the bedding and sheets that we currently have.
Furniture (bed, nightstands, new mattress etc.): $1,000 Majority of our budget is being allocated to the furniture, as we had NOTHING, and were starting from scratch.
Paint and DIY Supplies: $0. We had already painted the entire house and refinished the red oak floors into a more white oak finish during a previous house project. You can read about that here. However, I wanted to include this in the project breakdown, as if you're planning your own room makeover, it's important to include this in yours.
Decor and Accessories: $100 (aiming for sale prices)
MISC (unexpected costs): $100-$200
Initial Assessment of the Room
Before diving into the makeover, it's crucial to assess the current state of the room. Here's what we did:
Clear the Space: Remove any furniture, decor, or clutter from the room to start with a blank canvas.
Evaluate the Room’s Condition: Check for any repairs or updates needed, such as patching holes, fixing trim, or addressing flooring issues. We were able to skip this step, as we had repaired and upgraded the bones of the room before moving in.
Measure the Room: Accurate measurements are essential for planning furniture placement and purchasing the right size items.
Identify Focal Points: Determine any architectural features or elements you want to highlight or work around.

Current State of the Small Bedroom, Emptied out & ready to be transformed!
Creating a Mood Board
A mood board is a fantastic tool for visualizing the overall aesthetic and ensuring all elements of the room come together cohesively.
I browsed Instagram and Pinterest for inspiration, and found that I was drawn to a simple, minimal look, but also wanted to keep it warm and inviting. After that, I knew the colour palette had to remain neutral, and I wanted to incorporate some neutral, brown tones, and organic elements to keep it fresh and relaxing.
For furniture, I had this white end table that was previously used in our nursery for both of our kids, and it was sitting empty in our hallway. I knew I wanted to integrate it into our guest bedroom makeover for many reasons. First of all, it was in our kids' nursery so it holds sentimental value to me. Second, I knew if I used this, I could save money, and allocate it elsewhere. Lastly, it fit the vibe. It has the wicker basket to add a coastal, natural, organic, element and when you have a beach house, this is the perfect addition! For decor, I knew I wanted to first shop our home and not purchase a ton of extra decor. We had a few pieces that I planned on using for the space, so sometimes creating a mood board can be difficult if the pieces are old. For bedding, I kept our bedding from our last spare room and had full intentions on using it here! Again, we wanted to keep things pretty, practical & affordable!
Here are some of my Mood Boards for the space:


By planning ahead and creating a mood board, you can ensure that your guest bedroom makeover stays on track and within budget. Stay tuned for the next part of this series, where we'll dive into the actual makeover process, including what we use for paint, furniture selection, design dilemmas of a small space, and decorating tips.
With careful planning and thoughtful design choices, you'll be well on your way to creating a beautiful and budget-friendly guest bedroom that your guests will love.
Happy decorating! xoBW
Commentaires