
.png)
*DISCLAIMER: I am NOT a professional. Any advice used in this blog post is at your own risk.
When we first bought our 1960s fixer-upper, we knew there would be some big renovation projects in our future, but nothing prepared us for the reality of tackling a popcorn ceiling removal.
Like many homes from this era, ours was covered in that infamous textured ceiling that had seen better days. Initially, we thought about hiring professionals to handle the job. However, when we were quoted a jaw-dropping $16,000, it became clear that DIY was going to be the name of the game for a lot of our home improvement projects, including this one.


Move in day (Empty House) | Water Damage on the ceiling | Close up of popcorn ceiling
The Popcorn Ceiling Removal Process
Removing the popcorn ceiling was intimidating at first, but it turned out to be the easiest part of this entire project. Here’s a step-by-step guide on how we did it:
If you prefer to watch the video: check it out here
1. Preparation:
Protect the Area: Start by covering the floors, furniture, and anything else you don’t want to get dirty with plastic sheeting or drop cloths. Popcorn ceilings are messy, and you’ll want to keep cleanup to a minimum. While prepping takings extra time - it's well worth it! Just trust me on this one.
Safety First: Make sure to wear protective gear—safety goggles, a dust mask, and a hat are must-haves. If your home was built before 1980, test the ceiling for asbestos before starting, as disturbing asbestos can be hazardous to your health. We had a professional come in to test it for us! Thankfully, it was negative!


2. Wetting the Ceiling:
Water Sprayer: Fill a sprayer with water and lightly mist a section of the ceiling. The key here is not to soak it but to make it damp enough to loosen the popcorn texture. Let the water sit for about 15-20 minutes to soften the material.
Test a Small Area: Before going all-in, test a small patch to see how easily the texture comes off. If it’s stubborn, give it a little more time or a second misting.
3. Scraping:
Tools Needed: We used a wide putty knife for this step. Some people recommend a a special ceiling scraper, but we found the putty knife worked just fine.
Gentle Scraping: Start at the edge of your test area and gently scrape away the popcorn texture. If you’re lucky, it will peel off in sheets. If it’s more stubborn, you may need to add more water and scrape a little harder, but be careful not to gouge the ceiling underneath.


4. Skim Coating:
The Unexpected Challenge: Once the popcorn ceiling was removed, we were surprised to find that the ceiling was far from the smooth surface we had hoped for. Instead, it was pitted and uneven, making skim coating a necessity.
Mudding the Ceiling: To make this job a little easier (if that's even possible), I went in with a roller to apply a thin layer of joint compound (also known as mud) over the entire ceiling, while my husband scraped off the excess while smoothing it using a wide drywall knife. This step requires patience, as you need to smooth out the compound evenly across the ceiling, and it will dry, so you have to move in smaller sections.
Taping: If there are any seams or cracks, now’s the time to tape them with drywall tape and cover them with mud. This ensures a smooth, seamless finish.
5. Sanding and Second Coating:
Sanding: After the first coat of mud dried, we sanded it down to smooth out any imperfections. This part is dusty and tedious but essential for a professional-looking finish.
Second Coat: In some areas, a second coat of mud was needed to achieve the smoothness we wanted. We repeated the process of applying, drying, and sanding until the ceiling was ready for priming and painting.


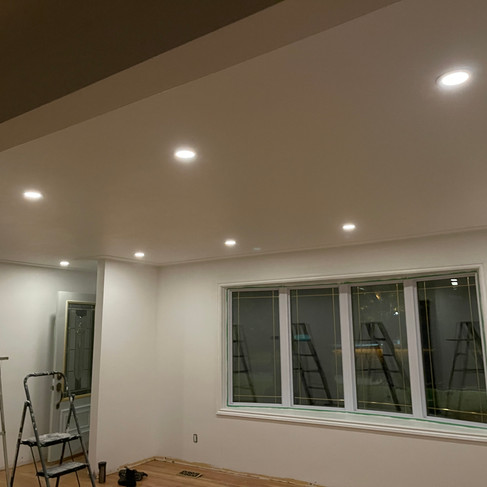
BEFORE AND AFTER
Lessons Learned
This project reminded me of labor. With labor you have this expectation, or idea in your head, of how you want birth to go, and plan Z always ends up happening! Removing the popcorn ceiling was surprisingly straightforward and satisfying. If you’re hesitant about tackling this project yourself, don’t be. The hardest part, by far, was the skim coating. We assumed that once the popcorn texture was gone, the ceiling would be smooth, but that wasn’t the case for us. You might be lucky to find that yours is smooth - the joys of DIY and older homes, is you never know what you're going to find! The uneven surface required multiple coats of joint compound and a lot of sanding to get it just right.
In the end, though, the effort was worth it. Not only did we save thousands of dollars by doing it ourselves, but we also gained valuable DIY experience and a sense of pride in our home’s transformation. While, we didn't get to doing the whole house, including the bedroom ceilings due to a time crunch, we are so happy with how this renovation is coming along. Who knows what the future holds, and if we'll get the itch to remove the popcorn ceilings in the bedrooms as well, but for now - we enjoy this incredible living room transformation.
See how we refinished our red oak hardwood floors to look more modern in a lighter, white oak finish here to really complete the Living Room Reno.


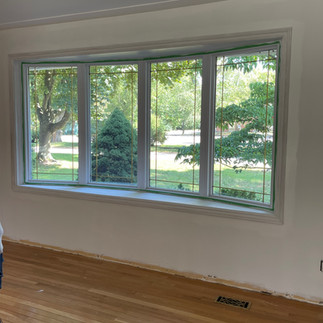
After: Beautiful, Bright & Modern!
If you’re considering removing your own popcorn ceiling, go for it! With some patience, the right tools, and a bit of elbow grease, you can achieve a smooth, modern ceiling that elevates the look of your home.
PRODUCTS USED:
paint nap (for drywall) - make sure you get 1 1/4 inch nap, or if you're Canadian - 31mm
electric sander (similar)
DON'T RECOMMEND:
Comentários